Painting simulation
Painting simulation allows you to see the areas of the parts that will be painted, as well as perform control of the thickness of the future paintwork (depending on the chosen type of painting).
Before creating a painting operation, you should first load the part on the "Model" page. After creating the operation, you should perform the following actions:
set the part for the operation that should be painted;

set the empty workpiece for the operation;
select the “Painting” simulation type
 in the operation parameters
  ;
;select the painting type
 .
.
There are two types of painting simulation in the system:
Simple

This type of painting simulation shows which areas of the model will be painted. After selecting this type, it remains only to calculate the toolpath and on the "Simulation" page to see the result of painting.
Thickness measurement

This type shows not only the areas to be painted, but also displays the approximate thickness of the future paintwork. To use it correctly, you should perform the following steps:
set the work feed
 in operation feeds
  ;
;set the paint flow rate
 in operation parameters
.
in operation parameters
.
After that, you can perform the calculation of the operation and go to the “Simulation” page.
On the “Simulation” page, when you select a painting operation in the operations tree, a form will appear that allows you to manage the painting simulation parameters.
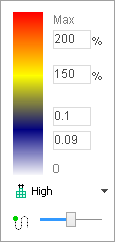
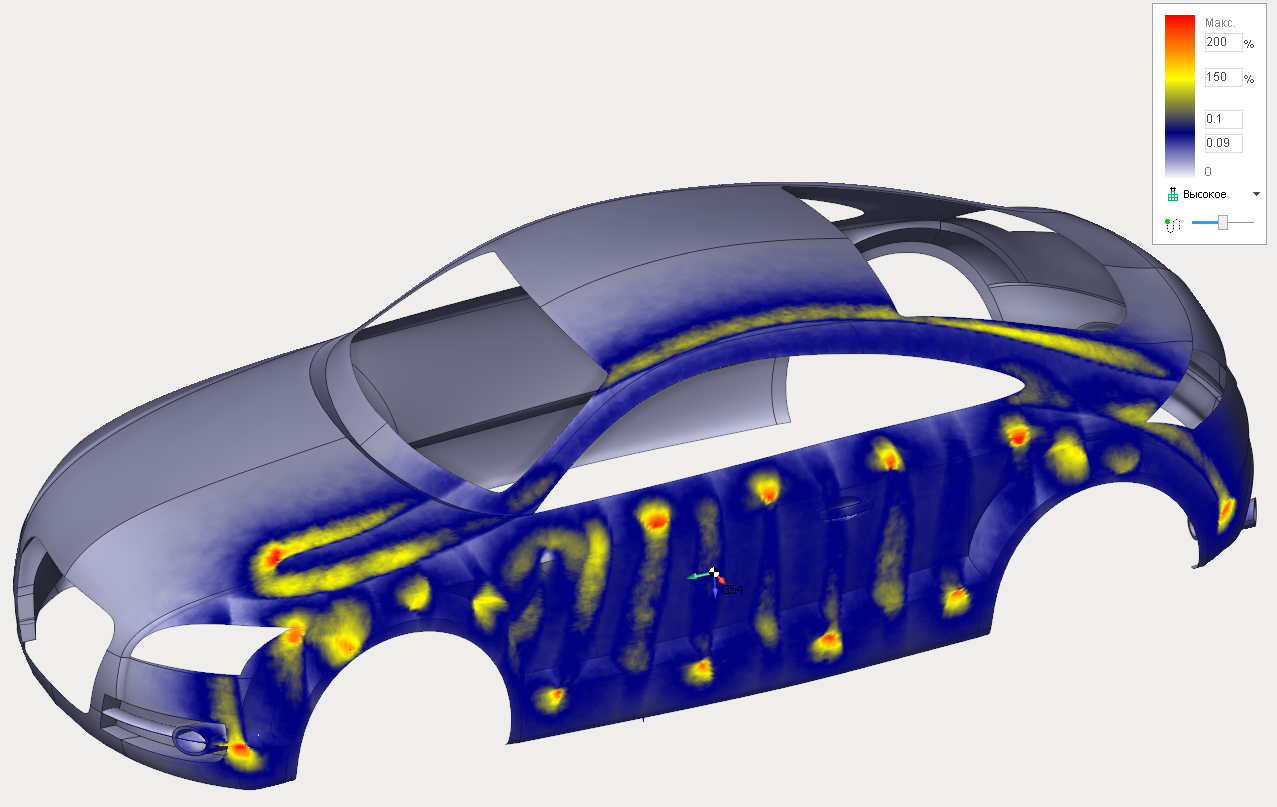
The form displays a color scale, the lower color of which corresponds to the permissible thickness of the coating and is displayed by the color of the tool, while yellow and red colors are needed to display excessive thickness of paint overlay.
For permissible thickness, a range of values in mm can be specified. For excess thickness, the values are set in percent of the upper value of the permissible thickness (as in the example on the picture: 150% from 0.1 is 0.15).
You can also change the resolution of the model, which will affect the accuracy and, accordingly, the performance. After changing the resolution, you should click "Reset" ![]() and run
and run ![]() the simulation.
the simulation.
The last parameter on the form allows you to set the painting simulation step. With a large step accuracy decreases, but performance increases. This parameter, for example, can be used for quick results when high accuracy is not required.
Note: The “Model resolution” parameter requires a reset. All other parameters have an impact on painting simulation immediately after the change.
An example of painting simulation result: