The input statement <INPUT>
This operator is designed to input data from the keyboard when the program is running.
Syntax:
INPUT {<input definitions>}
input definitions = {<input caption>, | <input caption>,} | {<input definition>} | {, input definitions}
input definition = {{checkbox, }<variable>} | {<array>, <variable>}
array = array of <string | real | integer>
caption = "literal string" or string expression
input <input definition> < | << <file name>
Description:
Use <INPUT> keyword to define for this statement. Use Caption to provide hint to individual input fields, there can be more than one caption for input field but multiple captions will be placed vertically. To define option selection input field use specify array filled with option values, when user selects the option its value will be stored in variable. Pass variable only to define edit input field, the current value of the variable will be the initial value of the input field, the text user inputs will be stored in the variable. There is no limit on the amount of input fields.
To set dialog window title pass "title##caption" as caption. Note that each subsequent "title##caption" parameter will override the dialog title.
To add image to the input window use literal string "pic=<filename>". The input window size will be adjusted to fit the image.
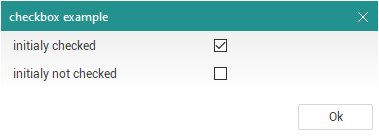
Use checkbox keyword to create checkbox input. Checkbox will be initialy checked if the variable value is not zero. The return value of variable will be zero if the checkbox is unchecked and not zero if checked.
To enter information from the disk, you must reassign the input from a file by specifying the characters < or << after the list of parameters and the name of the input file. In this case, when the statement is executed, a message in quotation marks (literal string) is displayed, and data is entered from a file with the specified name.
symbol < – start entering values into the variables of the current input operator from the first line of the file.
symbol << - continue input from the line following the end position of the previous input operation from this file.
When the last line is reached, the value "#endoffile" will be obtained.
Samples:
INPUT "sample data input: ", Zt

MachineName$ = "Leader"
INPUT "Input the NC-machine name: ", MachineName$

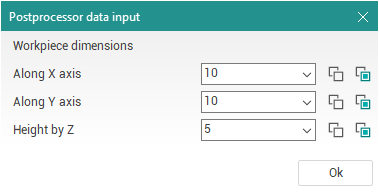
wx = 10; wy = 10; wz = 5
INPUT "Workpiece dimensions",
"Along X axis", wx,
"Along Y axis", wy,
"Height by Z", wz

! variable title and caption. notice the '""+' trick to make PP use the variable caption and title
rr = 2
title$ = "title"
caption$ = "caption"
input "" + title$ + "##" + caption$, rr

! select from list of options
arr: array of real
arr[1] = 1.1
arr[2] = 2.2
input "caption", arr, rr

!checkbox input example. notice the '""+' trick to make PP use the variable caption
title$ = "checkbox example"
caption1$ = "initialy checked"
caption2$ = "initialy not checked"
init_checked = 1
init_unchecked = 0
input "" + title$ + "##" + caption1$, checkbox, init_checked, "" + caption2$, checkbox, init_unchecked

Each edit field has two buttons to work with the Windows clipboard:
 – Copies the edit field text into clipboard (shortcut: [Ctrl+C]);
 – pastes the text from clipboard into the edit field (shortcut: [Ctrl+V]).
See also: